How to Screenshot on Dell Laptop

Do you want to know how to take a screenshot on your new Dell laptop or computer? It is very easy.
A screenshot is a photocopy of what you see on the computer screen. They are essential for a variety of purposes including taking classes, preparing tutorials, etc. Taking screenshots will help you to facilitate communication and transfer exact information on the subject.
There are several ways to take a screenshot on a Dell computer. You can capture the screen very quickly by pressing one or more keypad buttons or through the menu item. Let us check them in detail,
How to Take a Screenshot on a Dell Laptop or Computer?
It doesn’t matter what Dell model you are using. The following methods will work on any Dell device to take screenshots.
1. PrtSc

Press PrtSc (Print Screen) key on your Dell keyboard. Normally, it will appear next to the F12 key, on the top row. Press it to save your current screen to the clipboard. It copies everything you see on your screen, including the browser tabs and taskbar.
Open an image editing software like Paint and Press Ctrl + V to paste your screenshot.
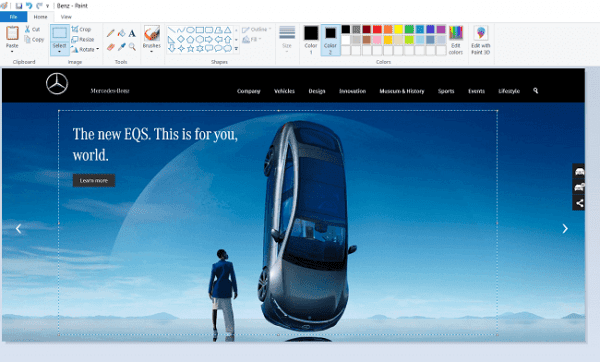
Then, you can crop the image to remove unwanted parts from it.
2. Windows + PrtSc
This is another method to take a screenshot on Dell laptops. Find Windows key on your keyboard. It will appear in the bottom left corner.
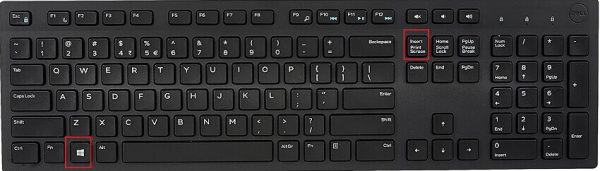
Hit the keyword combinations Windows + Print Screen together to take a screenshot. The screen will blink for a moment. It confirms that your screen has been captured. It will automatically save your output on the Screenshots folder.
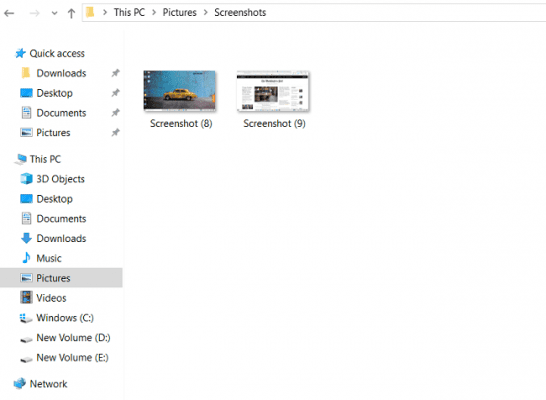
Visit This PC> Pictures > Screenshots to find your image file.
3. Alt + PrtSc
Whether you are using a Dell laptop or computer, press Alt and PrtSc (Print Screen) keys at the same time. It will take a snapshot of your active window and save it to the memory.
Open Paint and choose Paste from the menu or use Ctrl + V keys to see your screenshot.
4. Snipping tool
There is a built-in screenshot capture tool on all Windows computers- The snipping tool. You can use it anywhere on Dell PCs to capture screens either instantly or with a delay option.
Type ‘Snipping tool’ in the search box of your Windows device (left side of the taskbar).
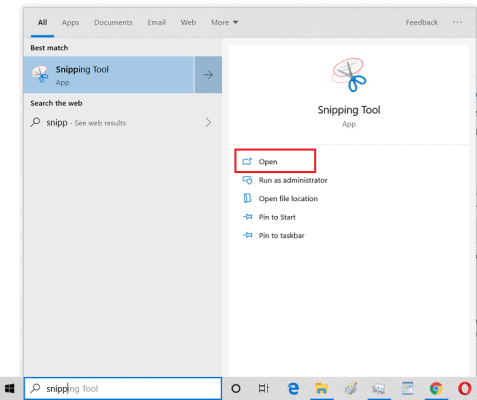
It will display the Snipping tool on the top. Click open. Then, the app will open and automatically minimize to the taskbar.
Head to a browser tab or Windows software of which you want to take the screenshot. Click the Snipping tool icon from the bottom. A small popup box will overlay your current screen.
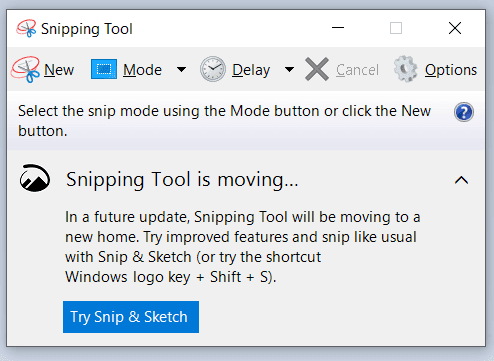
It allows you to take screenshots on any shape or current window or an entire screen. For a rectangle-shaped screenshot, choose Rectangle Snip from the Mode drop-down box. Drag anywhere on the screen to cover your selection. It will capture the portion and open it using the built-in image customizer.

It has limited customization options like text highlighter and pen. When finished, save the file.
5. Browser extension
If you want more control over screen capturing, switch to a browser extension. Google Chrome users will have unlimited options to take a screenshot as they need.
Nimbus is a popular Chrome extension to screenshot on computers. It offers several ways to capture a screen—visible part of a page, selected area, selected & scroll, the entire page, etc. Video recording is another advantage of this extension.
Open a website to take the screenshot. Click the Nimbus icon from the top-right corner of your screen.

Drag on the screen with your mouse. When finished, release it to view further options. A small box will appear below your selection with three icons. Use the tick icon to save your output in the local storage directly.
Click the pencil icon to open your screenshot with an in-built image editor. It will redirect you to another screen.
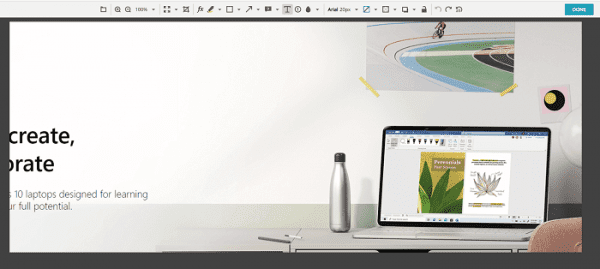
On the top, you will see options to add and highlight texts, blur area, color fill, etc. After making the required modifications, click on Done to download your screenshot.
Alternatively, you can save it to Nimbus Cloud other popular cloud storage services like Google Drive and Dropbox. It is useful to store and access files from any device having internet connectivity.
Read 11 Ways to Take a Screenshot in Windows 11 (+ Browser Extensions)